1. Unlimited groups(categories) under which to store/manage your contact information
Categrory/Group belongs to one of the most helpful
series of
lookups. You create a categrory/group item
once and use it across all your records when adding or
editing, unlimited number of times. Further, if you change/rename
category/group items, the changes are automatically reflected across all records in
the database using the
category/group items. Less typing - less errors, more productivity.
Be it for your contacts, company list, tasks, daily schedules, to-do-list, mailing list etc.,
Category (Group) Manager helps keep your records in orderly manner.
Category (Group) Manager also helps you to quickly remember and locate records without unnecessary "brain-storming".
You can edit group/category name, delete or move subsgroup/child item from one root/parent to another.


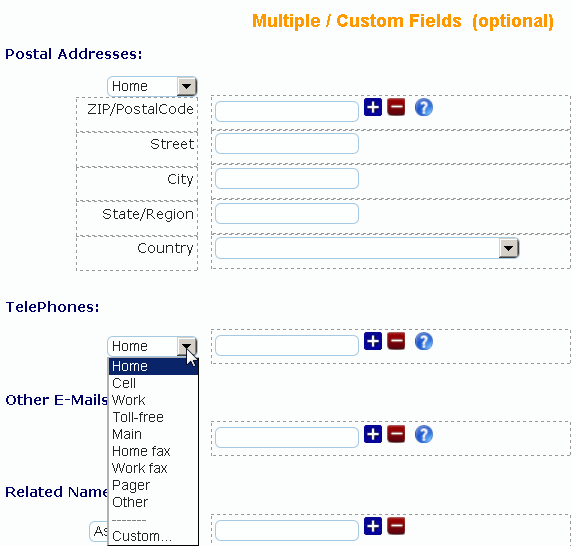
2. Unlimited custom fields to store non-standard information
Although the
Personal section enables you to enter basic data about a
contact, there are situations whereby you want to extend this capability. Your contact, for example, may have
many telephone numbers (fax, mobile, work, home etc.) or
mutiple addresess (home, office, vacation etc.), or
related names (assitants, secretary, spouse, parents, children etc.)
There could be other information which are not common and may not be known before hand. In such a case, use the
Multiple / Custom Fields section to:
- Create custom fields.
- Give name to each custom field created
- Enter the additional contact information
The number of
custom fields you can create is unlimited. All information you enter and save in the
Multiple / Custom Fields section will be automatically linked to the
contact's main data.
3. Manage different categories of contacts - personal, business, etc.
COMPANIES are also contacts, but business entities, hence they may demand different requirements for data management.
For example, it is common to have many contacts working in one company, whereas you seldom have one contact
working in multiple companies.
Nevertheless, you still need to connect and stay in touch with
Companies in your database, track and manage data, but with a higher level of flexibility.
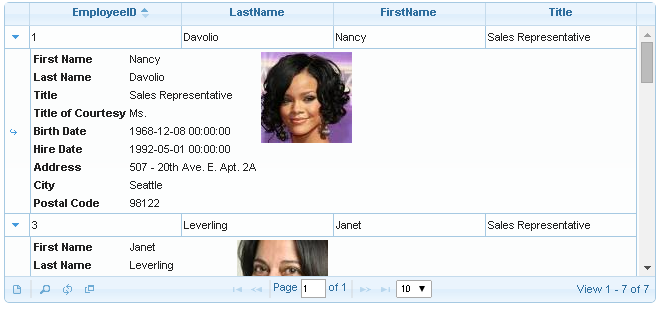
COMPANIES section contains records or information about organizations you have added to your database.
Main company records are displayed in the topmost table, with detailed (attached, linked, miscellaneous, custom fields) information shown in other tables
below the main table in a
Master-Detail relationship.
 Companies
 may be associated with individual contact(s) or be without any such association.
In your record entries for companies:
- You store various information such as company name, address, telephone numbers etc., add the company to any or none of the groups you have predefined
- You can link (attach) one or many contact(s) to a company. The contact records you must have created earlier in the CONTACTS section)
- You can browse company info either by scrolling the listview (table) or by double-clicking the record to invoke a dialog form
- You can view detail (attached, cross-linked) info for the company by selecting the company's record in the master table (the top table).
- You can set automatic anniversary message sender to companies in your database
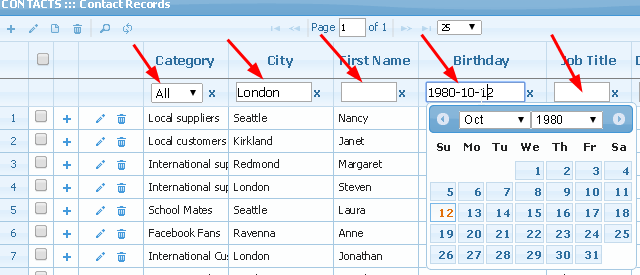
As usual, apart from browsing the records, you can filter(search) records by columns or, using the search form, carry out complex search with multiple combinations of criteria, sort records by columns, view records in separate forms.
You can re-arrange the columns to suit your preferences and also export(save) the records into files on your system.
Excel, PDF, CVS file formats are supported.
4. Cross-link your business contacts to their organizations in the database
The real power of
Advanced form format comes into play when you
want to
establish one-to-many or
many-to-one relationship (link) among records in your database. This is called
"Master-Details" relationship.
 Example1 : Contacts Linker
Consider a situation, where
you have many contacts working in the same organization. Instead of entering
the contacts information and
repeating the company information along with each contact, all you need do is:
- In the CONTACTS section, create a record each for the contacts. Enter only the personal (basic) information for the contacts. Other information you can leave blank.
- Assuming the company is not yet in the database. In the COMPANIES block, without selecting any record, click the Advanced Form link to open the Advanced Form on a new page.
All is ready to Create a new record for the company, including telephones, e-mails, fax, website, description etc.
- Assuming the company is already in the database. In the COMPANIES block, select the company record, click the Advanced Form link to open the Advanced Form on a new page. All is ready to Edit the record for the company,
- In the Contacts Linker tab of the form, a drop-down choice list of your contacts not yet attached (cross-linked) to any company is published. Except the heading, nothing is displayed if there are no un-attached contacts.
- Use the Contacts Linker to automatically link your contacts (if any) to the organization. To select multiple items, press CTRL key while you select
- If necessary (optional), you can Inherit data for selected contacts from the Organization(Company). You can Inherit data such as Company Name, Address, Phone, Fax, Email etc. from the parent Organization (Company). First select the contacts (from the list above), and then mark the type of info (below) you want to import for them from the parent organization.
- Enter other necessary information (in other tabs) for the company. Save the record.
Now, if you select the company record in the
COMPANIES block, records of contacts we have attached to the company will be
displayed in one of the several tables below the main table. Parallely, in the
CONTACTS section each of the contacts we have linked will have the company name and other
information as part of their records.
As you can see, this is more efficient and productive.
Again, the logic is simple: you rarely have one contact working in many companies, but its commonplace to have many contacts working
in one company. The
company becomes the Master, the contacts - Details.
Example2 : Multiple / Custom Fields
Multiple / Custom Fields can be used to create customs fields to store additional information. To do this:
- Create custom fields.
- Give name to each custom field created
- Enter the additional information
The number of
custom fields you can create is unlimited. All information you enter and save in the
Multiple / Custom Fields section will be automatically linked to the
company's main data.
In this example, main company info is the Master, while created custom fields are the Details.
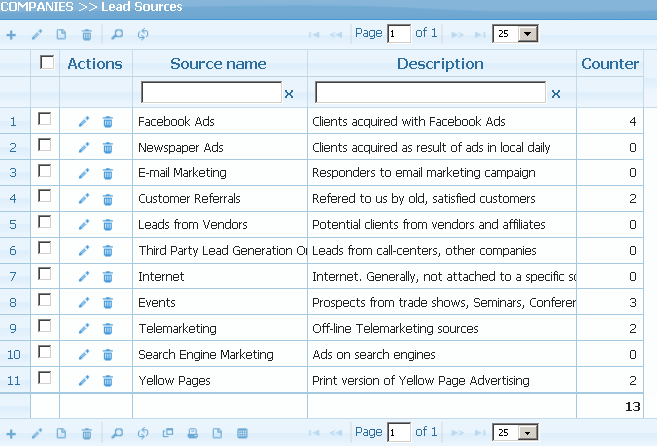
5. Analyse Customers' Lead Sources
Lead Sources helps you to qualify contacts or organization
according to the channels they have used to contact you.
- What do you think is your most valuable source for new clients?
- Is it networking? The internet? Email or direct marketing?
- From where do your organization's best leads and sales originate?
- What are your best lead sources (channels), and how to track conversions from each
This is what
Lead Sources are all about.
Lead Sources can help you gain in-depth knowledge of
where your prospects are coming from, consider how you can adjust your approach to the market and leverage the opportunities.
According to the survey results by the Chief Marketing Officer (CMO) Council, most valued source of leads is from customer referrals.
- 54% Customer Referrals
- 14% E-Mail or Direct Marketing
- 8% Internet
- 7% Events
- 7% Leads from Vendors
- 3% Third Party Lead Generation Organizations
- 8% Other
These are some of the reasons why you should maintain a list of your
Lead Sources.
Once you have this list, each time you add a new contact or organization to your database, the list will
be populated in a drop-down choice list, so that you can select and automatically link the
data to the necessary
Lead Sources.
6. Ready-made web forms for your website for future contacts to submit information directly into your account database
WebForms simplify the process of capturing visitors' or users contact data from your website into your contact database in the system.
WebForms wizard can be used to
generate literally any kind of form for submission via the web.
This way, you can additionally unify your sales tracking systems,
collect new leads from your website and analyze the effectiveness of your
online marketing campaign.
How to Use Online Contact WebForm - How it Works
- Use Webform wizard provided in the system to create WebForm for your website, from where your future contacts can fill in information and automatically submit it to your contacts' database in the system.
- Depending on your service plan/priviledges on the system, you can create up to 10 different Webforms or none.
- Mark (check) the fields you want to include in the resulting form. Only the checked
 fields will be included in the form
- To select/unselect all fields with a single click, click the topmost checkbox that reads "Select/Unselect All"
- The fields with red hysterics are mandatory. Even if you unselect them, they will still be included in the resulting form.
- If necessary, specify the fields size (that is, the visual width of the form fields). By default it is 50 and should be ok in most cases.
- If necessary, change the field labels description. For example, "ZIP" to "Postal Code".
- Select the Category(Group), under which you want to add the future contacts data send from your website. If you have no Category(Group)(s) yet, then you be sure to create them in the Categories section
- Specify address of the web page to which visitor will be re-directed after s/he has submitted the form. Example: http://www.yourdomain.com/thank-you.html. If you leave the field empty or you have free or trial account, then system default thank-you page will be used.
- When done, click the Create button.
- Resulting webform codes provides ready-made, fully functional basic form with client-side email validation javascript that means industry standard. However, if you want to validate additional fields before allowing visitors to submit, then modify the necessary codes. Knowledge of javascript and HTML is required.
- Copy the resulting code and paste into your website for your visitors to fill-in their data and automatically submit directly to your account database
- Before the Webform can be used on your wesbite, you must save its security parameters and other options into your account database:
- Check/tick/mark the "I have copied the Code for the webform and will Use the form on my website" box and then click "Save Security Paramaters and Options. HIGHLY RECOMMENDED!" button.
- Complete the form and save it.
That's all!
Some examples of finished Webforms as they will appear on your website
Example1

theme - Redmond |
Example2

theme - Ui-Darkness |
Example3

theme - Smoothness |
Example4

theme - Ui-Lightness |
7. Automatic Mailing address labels generator for envelopes
Mailing Address Labels Generator processes records in an easy way to export the data in form of labels with
recipient addreses - contacts, organizations or both.
Address Labels can be saved to file, printed and used as stickers for envelopes. This may be useful if you want to send business offers, product catalogs etc.
to the postal addresses.
Address Labels uses advanced mail-merge functions of
FadOffice system.
Contact Name*, Company Name, Postal Code (ZIP), Region, City, Street, House No., Address, Country are processed not as columns,
but as lines to form a single block called address label.
Thus,
Line 1: Contact Name (if available)
Line 2: Company Name
Line 3: Street, House No.
Line 4: City
Line 5: Region (district)
Line 6: Postal Code (ZIP)
Line 7: Country
Address Labels are generated from
CONTACTS or/and
COMPANIES data sources and can take several forms:
Under the
CONTACTS block we have:
- 1. Address Labels (Personal) - personalized, with Contact name, but without Company name;
- 2. Address Labels (Business) - personalized, with Contact name and with Company Name (if available).
Under the
COMPANIES block we have:
- 1. Address Labels (Personal) - personalized, with Contact name (if available) and Company name. Address is Company Mailing address;
- 2. Address Labels (General) - general, without Contact name, but with company name. Address is Company Mailing address
| Address Labels under the CONTACTS block |
")
|
")
|
Address Labels under the COMPANIES block |
")
|
")
|
As usual, apart from browsing the records, you can filter(search) using the search form, carry out
complex search with multiple combinations of criteria, sort the addresses in alpha-numerical order, view them in separate forms.
Lastly, you can
export(save) the labels as Excel, PDF files to your system.
Notes
- Depending on the version of your browser, export/save functions may not work as described. Same goes for some old versions of office programs.
- Particularly, some versions of Microsoft Excel have proved to "mal-function" with address labels. If you experience this,
then we'll suggest that in place of Excel you download and use OpenOffice, which we have tested and has proved to handle
the address labels as expected - WYSIWYG (What-You-See-Is-What-You-Get). OpenOffice is a freeware program.
8. Contact data export to your computer in three file formats - Excel, CSV, PDF
FadOffice comes with advanced Reporting system. From exporting "raw" simple table list to complex Mailing Address Labels,
the system offers three possible reporting file format options -
Excel, PDF or CSV.

- After searching, setting the visible columns, you can proceed to export/save the records to your system for further manipulations.
- To export/save records to external files click "Excel, PDF or CVS" icon
- Follow the instruction that will appear on your screen
Notes
- Depending on the version of your browser, export/save functions may not work as described. Same goes for some old versions of office programs.
- Particularly, some versions of Microsoft Excel have proved to "mal-function" with address labels. If you experience this,
then we'll suggest that in place of Excel you download and use OpenOffice, which we have tested and has proved to handle
the address labels as expected - WYSIWYG (What-You-See-Is-What-You-Get). OpenOffice is a freeware program.